Monday, December 12, 2011

Characterization of para-phenylenediamine chromium tricarbonyl

On Thursday 12-1-11, we tested our final complex to see if we formed the desired product. The solution, which turned yellow after we began heating, was now a dark brown color that had a dark brown solid in it.
 (at beginning of reaction)
(after reaction was completed)

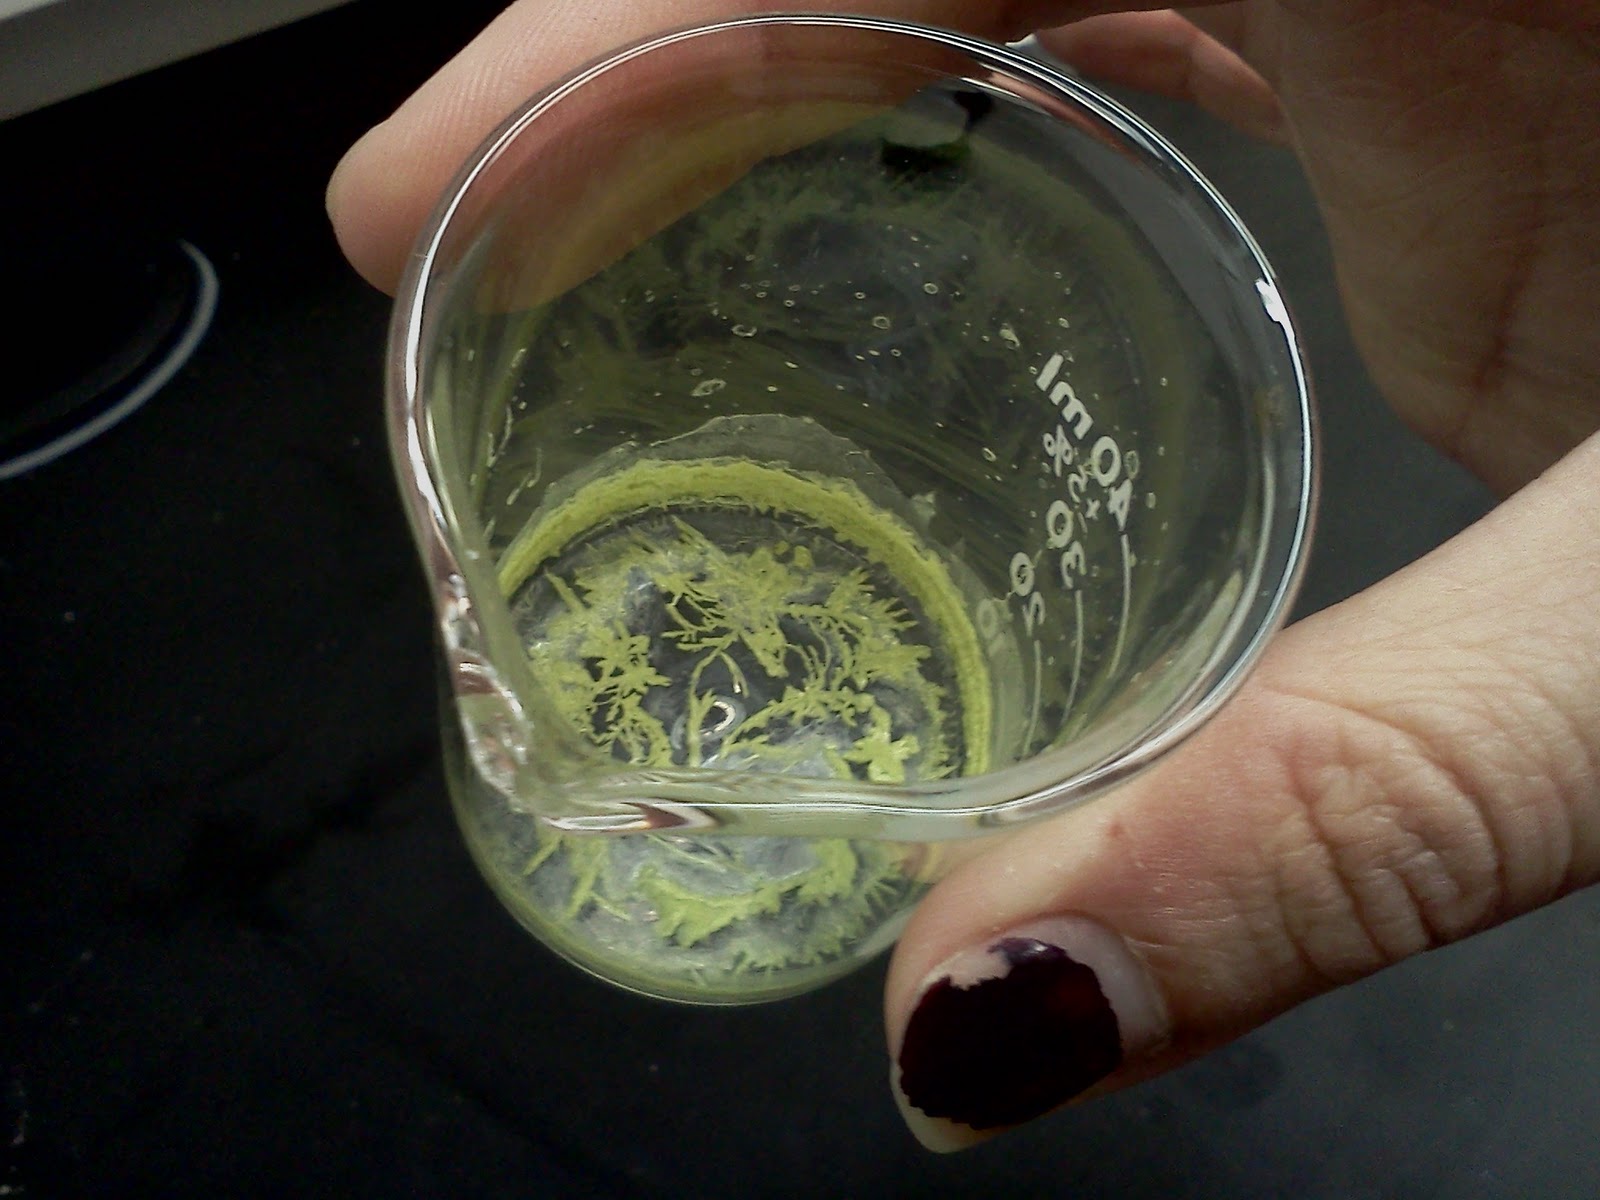
We vacuum-filtered the solid out of the liquid and tested the liquid in the IR. We didn't really get any peaks with the liquid, so we decided to test the solid. There were a couple of small yellow crystals in the dark brown solid which led us to believe that our desired product was contained in the solid. 

We had the idea of extracting the solid with methylene chloride four times, and we did this by mixing all of the solid into about 20 ml of methylene chloride and then vacuum-filtering out the remaining solid that hadn't dissolved in the methylene chloride. We added the remaining solid to another 20 ml of methylene chloride and repeated the process twice. We could tell that it was working because the methylene chloride turned yellow as we did this, and the amount of solid lessened with each extraction.
We added a boiling chip to the extracts and reduced the volume until there were only about 5 ml left in the hopes that this would give us more intense peaks. When we tested this liquid in the IR, there were very small peaks that correlated almost exactly to the literature values for this complex (we had 1954 and 1862 cm-1 while the literature values were 1954 and 1862 cm-1). We could then consider our final synthesis a success!!

For the last week of the semester, we worked on putting all the aspects of our labs and our project together so that we could present them in one portfolio. Overall, we had an awesome semester! We learned a ton of new lab techniques and worked together to make our project a complete success, with 6 out of 6 complexes synthesized. We got to see a variety of different inorganic compounds (all pretty colors, of course!) and we developed a new appreciation for organometallic compounds such as our Cr Arenes. We in Purple Chrome wish that you could have as much fun reading this blog as we had doing the experiments we wrote about!

Wednesday, November 30, 2011

Final Cr Arene!

On Tuesday 11-22-11 we tested the fluorobenzene chromium tricarbonyl that had been reacting for 5 days. We were a little apprehensive because this is what the flask looked like after it had burnt the preceding week:
When we took out the stopper, there was a greenish liquid in it, and there also looked to be a precipitate in it. We took out some of the liquid and tested it in the IR. The tabulated frequencies were 1982 and 1903 inverse centimeters. We got two peaks in the IR; one was at 1913 and the other was at 1985. These were so close to the tabulated data that we considered this reaction a success! We then vacuum-filtered the product to separate the liquid from the solid. The liquid was actually a dark yellow-green color once the precipitate was taken out:
The precipitate was light green in color, and we kept it in case we had time to recrystallize it and get pure crystals:
There were insoluble black specks in it like there were in the benzene chromium tricarbonyl, but we got rid of these easily when we dissolved the solid in methylene chloride to recrystallize it.

The next Tuesday (11-29-11) we set up the reaction for our last Cr Arene. This time, the arene was para-phenylenediamine. Since nitrogen-containing groups are electron-donating and this one has two amines on it, it shouldn't take very long to react!
We set up the two neck flask and gas condenser like all the other experiments, and vacuum-filled and argon-filled it. We added the solvents (10.1 ml of dibutyl ether and 1.05 ml of THF) to the flask through the septum and then we bubbled argon through the solvent to remove any oxygen. Since the para-phenylenediamine is so reactive, we needed to make sure that we had a completely inert atmosphere for the reaction. To do this, we cut the end off a syringe and stuck it into a tube attached to the vacuum line. Then we opened the gas valve and allowed the argon to flow through the syringe needle. We placed the syringe needle into the solvent and then added an exit needle to relieve the pressure (we had to close the stopcock on the gas inlet valve in order to get the gas to bubble in the solvent because the incoming pressure was too much, so we needed to have some way for the extra pressure to escape). We let the gas bubble through for 10 minutes and then we removed the exit needle and the syringe.
We removed the septum and added a stir bar, 0.330 g of chromium hexacarbonyl, and 0.160 g of para-phenylenediamine. We placed a greased stopper into the neck and began heating and stirring the reaction. We are going to leave this one react for two days because we can check it Thursday during lab, which will be a little less than 48 hours. As soon as the reaction reached reflux, it turned a bright yellow color, like many of the other reactions before. Tomorrow we get to check it out and see if we were successful for our final reaction of the semester!

Saturday, November 19, 2011

Another Cr Arene Reaction

On Thursday 11-17-11 we stopped heating the reaction of 4-trifluoromethylaniline that had been going for four days. It was a reddish-orange liquid that was cloudy. We vacuum-filtered it to see if we could get a precipitate out of it, and we did get a large amount of a dark yellow precipitate:
The filtrate was still a little bit cloudy and was still a red-orange color and this is what we put in the IR to test:
The tabulated data said that there should be two peaks: one at 1977 inverse centimeters and one at 1898 inverse centimeters. Our IR showed two peaks that were almost exactly in these two positions, so this reaction was a successful one! That makes three successful reactions so far, and one that we have gotten peaks for but have no data to compare it to.

We decided to set up another reaction for fluorobenzene since we didn't get good data from the last time. We set it up the same way but we used different amounts of reactants, since we have found that we have a better success rate when we have chromium hexacarbonyl in excess. The only problem with this is that it collects in the condenser if there is excess, but we try and collect it after the reaction is done because it can be vacuum-sublimated and used again. Here is an example of the Cr(CO)6 collecting in a ring around the middle of the condenser:
This time, we added 8 ml of dibutyl ether, 1 ml of THF, 1 ml of fluorobenzene, and 1.018 g of chromium hexacarbonyl and began stirring and heating on Thursday afternoon. It turned a light yellow color:

For the rest of that day's lab, we worked on the Spartan calculations that go along with our project. Unfortunately, there is more to this project than just doing a bunch of cool reactions! Our question we are asking is: how does the identity of the arene change the nature of the bonding in the complex? We are going to use Spartan images to try and demonstrate the effects of electron-withdrawing and electron-donating substituents on the complex.

The heat on our reaction was a little higher than usual because on Friday the inside of the flask and halfway up the condenser was blackened, but the reaction was still refluxing so we turned the heat down and let it go over the weekend.

Purifying our Wild Card Project

On Tuesday 11-15-11 we purified Part A of our recently redone Wild Card Project. Where the last time, we just poured the 5 20-ml portions of methylene chloride over the green solid while filtering the whole time, this time we decided to stir the green solid into the methylene chloride and then vacuum filter the solution to get the undissolved impure solid back out. We then replaced the filter paper with a new one and put the left-over green solid into another portion of methylene chloride. We vacuumed it and repeated this process for three more portions of methylene chloride. We knew we were dissolving the green solid in the solvent because after we were done extracting it, we had very little of the green solid left so most of it must have gone into the solution which was now yellow. We then added a boiling chip to the solution and heated it until most of the solvent evaporated.
Once this was done, we stuck it in an ice bath and hoped that we would see some crystals forming. The last time, this didn't really happen so we were hoping that we would get lucky this time! There was some solid in the beaker and we let the rest of the methylene chloride evaporate off so that the crystals would form. We finally did get a slightly shimmery yellow-orange powder that we figured was our pure product, and we got a lot of it, so we don't have to worry about not having enough to run tests this time. Here is the pure product:

The melting point of the pure product was 198 degrees Celsius. The melting point of Part B of the Wild Card was slightly lower at 140 degrees Celsius.

Wild Card (again) and A New Arene

The next lab day, Thurday 11-10-11, we decided that Purple Chrome needed to divide and conquer. Elom and Allen worked on redoing the Wild Card (both parts in one day...ambitious!) while I (Emily) set up a new Cr Arene reaction. First up: the Wild Card.

The procedure we followed was the same as the one that we followed for the previous experiment with a little bit of creative tweaking. The masses of ruthenium chloride, diazald, and triphenyl phosphine were all the same as we used before. The Diazald from Part A was not dissolving, so an extra 6 ml of ethanol was added to the solution. Part A went very quickly and we ended up getting the same green precipitate as we did the last time once we cooled the flask down to room temperature. Here it is, just filtered out of the solution:

We took this as a good sign that this was actually what we were supposed to get, because we reproduced the same result as we had the last time we did it!

Extra ethanol was also added to the solutions of ruthenium chloride and Diazald in Part B of the experiment to get them to dissolve, so we had a lot more solution than we did the last time. Everything went well until we got to the part where we had to add the triethylamine to the solution until it turned a deep purple color. This was REALLY hard to see the last time, and this time was no different. We added the 1 ml that it said in the book, but the color that it turned did not look that purple. It looked more reddish-brown than anything.
How are we supposed to see a change from dark brown to deep purple? We thought that maybe this time we needed to add more triethylamine, so we added 4.5 ml total this time, which was 3.5 ml more than we added the last time. We also gave it an extra 5 minutes of reflux time because of all the extra solvent in the flask. When we let it cool to room temperature, we had hardly any precipitate at all! We had a couple flecks of the same coppery solid as we did the last time, as well as an unknown lump of black (possibly burned) solid. Thank goodness we still had a lot of the precipitate left from the first time we did it, so we can use that. We will have to do IRs on these to see what we got, and hopefully we get better results than we did the last time!

Now for the Cr Arene reaction:
The next arene we decided to do was 4-trifluoromethylaniline. The reaction hints for our project indicated that this one might take 2-4 days to react, so we set it up on a Thursday so it could run all weekend. We set up the flask and did the vacuum/argon-fill as usual. We added 8 ml of dibutyl ether and 1 ml of THF to the flask. Then we added 0.4 ml of the arene and 1.079 g of the chromium hexacarbonyl. We started stirring and heating that day, and it turned a light yellow color:
Overnight, there was a collection of yellow in the condenser and it looked like the reaction might be losing some solvent from the level of liquid in the flask. We shut it off over the weekend, and then the next Monday we added 2 ml more of solvent and regreased the connections in the setup. The reaction then was heated non-stop until Thursday afternoon (11-17-11).

Next Arene: Fluorobenzene

On Tuesday 11-8-11, we started another reaction for our project and this time the arene was fluorobenzene. We chose this arene because we read that electron-withdrawing substituents (such as fluorine) on the ring will make the reaction proceed more slowly, and can sometimes stop the reaction from happening at all. From what we saw, one fluorine on the ring would only make the reaction a little bit slower, so we decided to try it. We found a procedure for the reaction that used large amounts of all the reactants, so we scaled it down to fit with the microscale approach we were taking to the project.

We set up the flask and did the vacuum/argon-fill procedure again, the same as all the ones before.


We added 10 ml of dibutyl ether and 1 ml of THF to the flask via syringe through the septum, and then we took the septum out and added 1.67 ml of fluorobenzene and 0.167 g of chromium hexacarbonyl to the flask. We started heating it and stirring it and let it sit overnight because the procedure we found said to let it heat for 24 hours. It started turning  green and there was a little bit of green solid that formed on the bottom when we started heating it:

We have found that the color change to green or yellow is always a good sign in this reaction!
We let it run for 24 hours and then tested it, but the IR didn't have the characteristic peaks of the solution. It may have been because of the IR which has been on the fritz lately, but more likely it was because it didn't have enough time to react, so we decided to try this one over again once we got a few more reactions done that were successful.

We also tried to get IRs for the Wild Card Project on this Tuesday, but we couldn't do the KBr pellet method, so we had to try dissolving the solids in something that wouldn't show up in the IR. We tried both of them in methylene chloride, but we didn't get anything conclusive from the IRs. Unfortunately, we didn't have a lot of solid from Part A in the first place, and after this we completely ran out. We decided that we would also do the Wild Card Project again to see if our yield was better for Part A (and to also see if Part B would still yield that coppery precipitate or if it would actually give us a gray precipitate like it says in the book!).

Since the IR wasn't being very helpful in our characterizations, we spent a little time trying to see if we could get GC-MS for two of our Cr Arenes (N,N-diethylaniline and methyl-3,5-dimethoxybenzoate) and the two parts of the Wild Card. Unfortunately, we ran all four samples twice, but we didn't get any conclusive peaks in the GC-MS. When we consulted Dr. Daryle Fish on this problem, he told us that maybe the products just weren't volatile enough to get good data from the GC-MS. This was a little bit of a waste of time, but we got to learn how to set up a method in the GC-MS that is tailored to our specific sample, so we did learn something useful that day!

Saturday, November 5, 2011

Solvent Transfer Lab

In this lab, we followed a very explicit procedure in order to learn how to do a solvent transfer on the vacuum line. We made a THF complex with CrCl3. We put 0.1 mmol of the CrCl3 and a stir bar in a flask attached to the vacuum line. The flask was a two-neck flask with a septum in the other neck. We vacuumed the flask and then filled it with argon gas, and then repeated this cycle. We added 8 ml of anhydrous THF to the flask via the syringe through the septum. In a separate round bottom flask, we put 2 ml of chlorotrimethylsilane and attached this flask to the vacuum line. We degassed this flask by doing three "freeze-pump-thaw" cycles. To do this, we had to freeze the flask in liquid nitrogen:
We then turned the valve to "open" to evacuate the flask of any gas, and then closed the valve and let the flask to warm to room temperature. Once the liquid in the flask was unfrozen, we froze it again and repeated the process. This took a long time to do!

We then performed a vacuum distillation, in which we froze the contents of the two-necked flask in liquid nitrogen and then opened the two-necked flask to the vacuum manifold. We also opened the round-bottom flask to the vacuum manifold so that the two flasks were open to each other, but not to the main pump. We could see that the chlorotrimethylsilane was leaving the round-bottom flask and entering the frozen solution in the two-neck flask because the amount of liquid in the small round-bottom flask decreased as time went on.

Once all the liquid had gone out of the round-bottom flask, we let the solution warm to room temperature and observed the color change of the solution from a light pink to a dark pink color.

It was supposed to change from green to pink, but somehow our solution in the two-neck flask turned pink before it was supposed to (before we even added the chlorotrimethylsilane). We then removed any unreacted materials by opening the flask to the vacuum manifold. This was a very useful technique to learn, even though we didn't really see the color-change that we were supposed to in the reaction.

Wild Card Project

We chose to synthesize two metal nitrosyl complexes for our Wild Card experiment. We tried to synthesize tricholoronitrosylbis(triphenylphosphine)ruthenium (II) and dinitrosylbis(triphenylphosphine)ruthenium (-II). For the first compound, we made separate solutions of 78 mg of hydrated ruthenium (III) chloride and 125 mg of Diazald each in 6 ml of absolute ethanol. In a round-bottom flask, we mixed 475 mg of triphenylphosphine in 18 ml of absolute ethanol. We hooked the flask up to a water condenser with a CaCl2 drying tube and brought this solution to a boil.

After it was brought to a boil, we removed the condenser and added the two solutions we had made into the flask. At this point, it turned a dark green color.

We let the solution cool to room temperature and we saw that something had precipitated in the solution. We vacuum-filtered it and got a green-gold precipitate.

We let the precipitate dry overnight and then we extracted this solid with 20 ml of methylene chloride, and the methylene chloride turned yellow.

We put a boiling stone in and boiled off the solvent until there was very little solvent left in the beaker. We cooled this in an ice bath, and crystals were supposed to form at this point, but we didn't really see anything happening. There was some kind of precipitate after a while, so we added some hexane and boiled off the solution again. We got some yellow-brown solid at this point.

We took the melting point of this solid, which was about 190 degrees Celsius. However, we did not have any reference data for this compound, so we couldn't really tell if this would help us to identify that we had made the product that we wanted to.

For the part 2 of the Wild Card, we placed triphenylphosphine in a round-bottom flask with 12 ml of absolute ethanol and stirred it until it dissolved. We attached a water condenser to the flask and heated the solution until it boiled. While we were waiting for the solution to boil, we prepared a solution of 50 mg of ruthenium (III) chloride hydrate in 4 ml of ethanol and a solution of 80 mg of Diazald in 4 ml of ethanol. We added the ruthenium solution to the flask first, at which time the solution was a dark brown.

We added triethylamine to the flask via pipet until the solution turned a dark reddish-purple. At this point, we added the Diazald to the solution and it turned a dark yellow. There was a precipitate that we vacuum-filtered and it turned out to be a reddish, coppery precipitate.

The manual, however, said that this was supposed to be a gray precipitate! We took the melting point of the solid and got 140 degrees Celsius. We have to do a KBr pellet IR on each of these, but we have yet to do this. Again, we have no reference for the IR data, so we have no way to determine whether we have made the products we were supposed to. Hopefully we can get the IR to work for us so we can see the NO stretches and compare them.

Challenge Day and Continuing the Project

October was a busy month, so we haven't had a lot of time to update the blog, but now it's time to catch this thing up to speed!

On Thursday 10-20-11 we had our Challenge Booth in honor of National Chemistry Week, which went well. People were educated about tooth decay (and a little freaked out about the fact that we used real teeth), but they mainly enjoyed the free gum we handed out at the booth! The other group's booths and demos were really interesting and we had a ton of fun with the Challenge. Here's a picture of our poster that we made for the occasion:

We had to get back to work after the Challenge, so we started another reaction for our project. The last reaction that we did was benzene, and that worked really well, so we decided to change our arene to N,N-diethylaniline. We set up the reaction the same way as we did before: we vacuum-filled and argon-filled the flask and then added the two solvents, dibutyl ether and THF, into the flask with a stir bar. We then measured out the Cr(CO)6 and the N,N-diethylaniline and added them into the flask. Once we started heating the solution, it turned yellow and then got darker as it kept heating. When the heating was stopped, the solution got lighter in color:

We set up the solution the Thursday before fall break, which caused the reaction to take a lot longer than it should have because it had to sit without heating over the weekend. It stirred and heated for 11.5 hours and then we tested it via IR to see that the two peaks in the CO region that corresponded to our desired solution. After this, we had to evaporate off the solvent, so we let it sit out in the hood for a week. We had light green crystals once the solvent had evaporated.

On Thursday 11-3-11 we tried to do a C13 NMR of our product in deuterated DMSO, but even with 512 scans the final scan was very noisy. It is a good thing that the IR is such a helpful way to identify the products, because we have had a lot of trouble with the NMR giving us good data.

While this one was sitting in the hood evaporating, we started another reaction, this time with methyl-3,5-dimethoxybenzoate. Again, we set up the two-necked flask, vaccum-filled and argon-filled it, and added the dibutyl ether and THF with a stir bar. We measured out the Cr(CO)6 and the arene and added them both to the flask. This time, because the reaction had to stir for 70 hours, we started it on Thursday at the end of lab and let it stir through Friday over the weekend until Monday morning. As soon as we started to heat the reaction, it turned light yellow. When we went back on Friday morning, we really couldn't see the reaction because the flask was blackened on the inside. The only problem was that we didn't have the data for this complex, so we didn't have anything to compare our IR to. We got a brown solid, and then we washed this with methylene chloride to get a yellow liquid. We then put this in the hood to evaporate off the solvent. After the solvent evaporated off, we had a light yellow powder in the beaker. We haven't had a chance to do an NMR on this yet, but we think we will try this next week.

Wednesday, October 12, 2011

Benzene Chromium Tricarbonyl and Challenge

On Tuesday 10-4-11 we checked via IR to see if we had made our desired compound. First, we got an IR of the pure Cr(CO)6 in methylene chloride to compare to our experiment. There was only one carbonyl peak at 2000 1/cm. We pipetted out a small sample of our solution from the flask. There was both a solid yellow-green precipitate and a similarly colored liquid in the reaction flask. We used the liquid for the IR and got a spectrum that had two carbonyl peaks that were slightly lower than the peak on chromium hexacarbonyl. The values were very close to tabulated values for the complex, so we are confident that we got the desired complex. We then suction-filtered the contents of the flask to get a light green precipitate but there were also some black specks in the solution. We recrystallized our product by putting the precipitate in a mininum of methylene chloride and letting it sit overnight to evaporate the methylene chloride. The next day when we went to go check the product, we had green crystals in the beaker:


We also wanted to take a C-13 NMR and an H-NMR of our product. We did this by scraping out some of the crystals and placing them in an NMR tube with some deuterated DMSO. Our product dissolved in this and we got both NMR spectra. They both correspond very well to expected values for our complex.

We had to come up with a demonstration for National Chemistry Week that had to do with health, hygiene, or medicine. Purple Chrome decided to do a demonstration about acid erosion of teeth. Pepsi and other soft drinks contain phosphoric acid, so we wanted to test and see what prolonged exposure to your teeth actually does. We made a 2 M and a 7 M solution of phosphoric acid, a 2 M solution of NaF (which should theoretically make the tooth stronger, not weaken it), and we also had some Pepsi. We massed 4 teeth and placed one in each of the solutions. Immediately, the teeth in the acid and in the Pepsi started fizzing:

The tooth in the NaF didn't really do anything once it was put in the solution. We left the teeth sit in the solution for 4 and a half days, checking in on them periodically. We could see the erosion of the teeth in the acid happening very quickly. Even the tooth in the Pepsi wasn't safe from some acid erosion! We took them out on Tuesday 10-11-11 to dry, and then we massed them. The teeth that had been in the acid were very soft and almost disintegrated when we tried to get them out onto the watchglasses to mass them. Our hypothesis was correct that the teeth in the acid would lose mass due to erosion ("demineralization") and the tooth in NaF would gain some mass due to remineralization. Here is what each of them looked like after we took them out of the solutions:
Look at how the coloring in the Pepsi stained the tooth! It was just white before it sat in solution.

The tooth in NaF wasn't eroded like the teeth that were in the acid.

This tooth, before it sat in the acid, actually looked a lot like the tooth that was in NaF. See how the top of the tooth (facing right) is almost completely eaten away, and there are just deep craters remaining!

This one USED to be a whole tooth, but it was so soft and degraded that it fell apart when we tried to get it out of the vial of acid. In places, it was so thin it was translucent!


This experiment definitely made us think twice about drinking Pepsi!!


Wednesday, October 5, 2011

Not Quite Perfect

The next day, we went up to the lab after the solution had 20 hours to reflux to find that during the night, we had an air leak and all of our solvent had boiled away. Nothing was left except a black residue on the inside of the flask and all over the stir bar. We got this cleaned up and decided to start the reaction again on Thursday.

On Thursday 9-29-11 we set the reaction up in the same way except for two differences: we used a smaller flask so that the contents would have more volume in the bottom of the flask (hopefully this would prevent the solvent from boiling away too fast) and we used a two neck flask instead of a three neck flask.


This would have one less way for the solvent to escape, so the reaction has one less way to fail. We didn't want to leave the reaction to run overnight again in case it would fail, so we set it up at the end of lab, and one of us could come in on Friday morning to turn the heat on.

On Friday 9-30-11 we turned the heat on at about 10:30 AM and let it go all day until 4 PM. The heating mantle was turned to 3 this time instead of 4. We still got the black residue on the inside of the flask, but we could tell that we still had solvent in the flask because nothing had bubbled up through the joints and there was still liquid dripping from the condenser back into the flask.

On Monday 10-3-11 we started a second round of heating at 11 AM and didn't turn it off again until 5. The total cook time at this point was 11.5 hours, which is less than the 20 hours we originally decided to do but we decided to do an IR spectrum of the solution the next day during lab to see if the reaction had proceeded at all, or whether it had failed again.

Finishing Ferrocene and Beginning Benzene

FINALLY...we got our acetylation of ferrocene to work. We ran the GC on Tuesday 9-27-11 and the highest peak on the spectrum was monoacetylated ferrocene. That is the most compelling evidence we have, and the only evidence we have that still contradicts the presence of monoacetylated ferrocene is the low melting point we got. However, 3 out of 4 isn't bad! That successfully finishes the ferrocene lab, which is good because we have gotten tired of writing about it!

Along with finishing ferrocene, we finished our purple crystals lab on Tuesday. Allen was responsible for this while I (Emily!) was working on other things. He did the isolation like with the benzene inclusion compound, but this time it was just the pure [Ni(en)2(NCS)2] crystals without any benzene added to it. These crystals took so long to grow, and even after five weeks, there were still only a couple of crystals in the vial (nothing like the vial full of benzene crystals we got). We finally decided to purify them and take the melting point since they didn't seem to be growing any more crystals. After the isolation, we got some very pretty dark purple crystals:

These actually look nothing like the benzene inclusion crystals, which were not shiny and dark purple but more dull and light purple. They were also much smaller crystals than these. Here's a picture of the benzene crystals to jog your memory:

We massed the new crystals so we could find percent yield for the lab report, and then we took the melting point, which ended up being above 220 degrees Celsius (that is the limit on our thermometer, so we couldn't get more precise than that!).

Since those two things didn't take much time, we were able to set up our first reaction for our final project. We are doing our project on Cr-Arenes, in which Cr(CO)6 is reacted with an arene in a solvent mixture of dibutyl ether and THF. There are so many arenes to choose from, but we just picked 6 of them to try and synthesize, purify, and characterize. The first arene we wanted to try was benzene.

We set up a three neck flask exactly the same as in the synthesis of ferrocene except with a condenser on the middle neck of the flask:

The condenser is needed to air-cool the reaction so the solvent doesn't boil away. We vacuumed and argon-filled the flask three times and then left the argon running throughout the experiment. We then added in the two solvents via syringe. We added 8 ml of dibutyl ether and 1 ml of THF.


 Now we needed to bubble argon through the solvents to get rid of any oxygen that might ruin the reaction. We "adapted" a disposable syringe to fit into a hose from the rack and stuck the needle through the septum so that the argon bubbled through the solvents. It actually looked like the solvents were boiling because of the gas bubbles:


While this was bubbling, we got 1 g of Cr(CO)6 (which is a white solid) and measured out 1 ml of benzene in a syringe. We had to take the septum out before we could add these two reactants plus a stir bar, so we just replaced the septum with a greased glass stopper. We had to wire down all the attachments and the hoses to prevent any accidents. After that was done, we turned on the stirring mechanism on the hot plate, and turned the heating mantle on to 4. Once it started refluxing, the color of the solution changed quickly from clear with the white Cr(CO)6 floating around undissolved to a light yellow-green color:

Since we have been reading about these complexes, we have seen that they usually have a yellow or orangish color so this color change was a good sign! We left the lab on Tuesday night feeling pretty confident that we would just let it stir for 20 hours, and we would come back on Wednesday to a perfect product that we could purify and characterize.

Monday, September 26, 2011

Acetylation of Ferrocene, Part Two

On Thursday 9-22-11, we had to redo the acetylation part of the ferrocene lab because it did not work the first time. The GC of our product did not yield anything, so we decided to try a different procedure to make the same product. This new procedure was scaled up considerably so we hoped that there would be enough of our product to run tests on.

We began by adding ferrocene, acetic anhydride, and phosphoric acid in a round bottom flask and placing this flask in a sandbath with an air condenser hooked up to a steady flow of argon gas. We heated and stirred it until the temperature reached 100 degrees Celsius, and then heated it for 10 minutes after that.


When we took the flask off to empty the precipitate, we found that in addition to the precipitate, we had a tar-like black substance stuck on the bottom of the flask. It had actually formed around our stir bar, so the stir bar was probably not stirring for a long time before we realized it! We did have some precipitate so we washed that into a large beaker of ice and waited for the ice to melt before we added some sodium hydrogen carbonate until the solution stopped bubbling with the addition of the base. This took a huge amount of NaHCO3 (around 7 grams) and by this time, the solution was starting to look like we were just boiling a beaker of mud. Once in the ice bath, it started to look a little better. It looked like a brown precipitate in a reddish solution.


We suction filtered it and got a large amount of brown precipitate, which we then used to make a GC sample, an IR sample, and a Mel temp sample.


The trouble is, we didn't get the GC yet due to technical difficulties and the Mel temp gave a melting point of about 59 degrees Celsius while pure acetylated ferrocene has a recorded melting point of about 81 degrees Celsius.

We thought that maybe there were impurities in the sample causing the melting point aberration, so we decided to recrystallize our product. We did this by adding the minimum amount of petroleum ether to our sample to make most of it dissolve. We then decanted the clear yellowish liquid (which was the product dissolved in the pet ether) into a clean beaker and let it sit overnight. After the night was up, the ether had all evaporated off and a layer of orange crystals was left on the side of the beaker--this was our pure product.


Unfortunately, a Mel temp test of the pure product gave us the same results as the unpurified product, so at this point we need our GC to give us some proof of acetylation. We know from the drastically lower melting point that there is a new chemical formed from this reaction, we just don't know what it is!